In any case, I may not have been doing much renovation, but I've been doing quite a bit of yard work. Here are some of the pictures of what I've been doing in the yard:
This was the first flowerbed, which my friend and I made (he came up with the swoop at the front). Oh yeah, for those of you that don't know, I have a dog now, named Max. That's him posing with the flowerbed. The next picture below is the start of my round flowerbed in a bare spot where evidently an old truck rested for about 20 years. First I dug the trench around it, then added soil conditioner.
On top of that I added top soil, then put in 3 lavenders.
Then I spread pine straw around it as mulch. In a later picture, you'll see how this bed has been updated.
Earlier in the year, I had planted 4 crepe myrtles that I got from my sister; I had a strange little bed set up with a triangle for three of the myrtles and then the larger myrtle off by itself. Once on of the myrtles died, I tore up the triangle bed and created an (roughly) oval one instead, incorporating the two smaller crepe myrtles as well as a lantana and two oleanders (one pink, one red).
The larger crepe myrtle I left to itself with some mulch and a trench around it as well.
I then planted some cannas (one Red King Humbert, one Pretoria, and one common canna with reddish-orange flowers), a knock-out rose, and a hibiscus:
The photo below is showing where the three cannas are in relation to the house, the yard, and the round flowerbed. You'll notice the sod and excess dirt in the bare spot next to the round flowerbed. That came from the next project I'll discuss here, my brick walkway.
The next 2 pictures are of my knock-out rose, which was a birthday present.
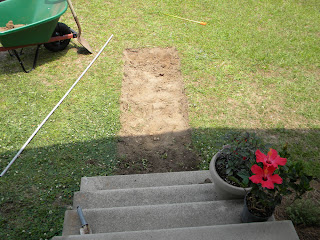
As I mention above, I also created a brick walkway leading up to my steps. I had some paving bricks given to me by the family next door when they moved out, so I decided one of my projects would be to make the walkway. It was fun, but very tiring!
I started out digging a trench where I wanted the walkway to go. Actually, I first laid the bricks out roughly how I wanted them to be to see what size trench I should dig. Then, I dug the trench, being careful with the sod since I planned to put it in the bare spot around the round flowerbed. I tried keeping it fairly straight, but I wasn't all that worried about it looking professional; I wanted it to look more "homey" than anything.
Once I had the trench dug, I added water to try and even the bottom out as best I could. In the future, I'll probably omit this step, since it didn't really seem to help much.
Next, I layered the bottom of the pit with sand. This also came from the people next door; they had filled a large hole with sand when they set up their swimming pool, and they took the pool but left the sand of course. They had given permission for me and the neighbors to get as much as we wanted.
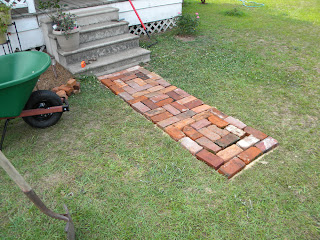
Once I had the sand pretty much how I wanted it, I then started laying out the bricks. I did the pattern below, did a different pattern in the middle, then finished off doing the same pattern on the end.
And voila, I have a "raw" walkway! I say "raw" because at this stage there's nothing to hold the bricks in place, other than the sandy bottom they're partway sunk into. But they're in place and ready for me to dump sand on top, then sweep the sand into the cracks.
And in the images below, that's just what I had done. I was lazy and didn't photograph the actual process of sweeping the sand. ;) That was just way too much on a (very) hot Monday afternoon.
Below are images of the house with the walkway in front. It would have been nice if I'd had enough bricks to make it as wide as the steps, but I think it looks fine this way anyhow.
The next image is just a closeup. Can you count how many bricks were used?
And this is an image of the walkway taken from the front porch. Note the hibiscus in the pot on the steps. This was before I actually planted it in the ground.
A few days after creating it, I decided to spruce it up some, so I added a few orange zinnias and a couple of solar lights. Max, of course, is in the thick of things.
Of course, plants grow, things change, and my flowerbeds are no exception. To the round flowerbed, I added a rosemary in the center and a branch of heart pine as an interest:
This picture was actually taken before the walkway was built, as the sod I put there from the walkway isn't in this image. I also was given several pieces of a wandering jew (or purple cane, as I call it), and it's taken off pretty well. This is the "before" image, shortly after I planted it.
And here's the "after" (taken today):
It's mostly lost the purple lol, but there's still some of it in there.
And now here are updates for some of the flowerbeds (taken today). In this first one, you can see how the walkway has matured somewhat, and you can see the bloom on the Red King Humbert canna. I'll enclose better pictures of that bloom below as well.
It's in shadow, unfortunately, but it gives an idea (especially if you click on it to see the larger size) how the flowerbed along the porch has come along. On the other side of the AC unit is a yellow Angel Trumpet Bush; on this side of the unit are 3 tomato plants, then several echinaceas and some sort of lamb's ear, then my yellow miniature rose and 2 petunias. In the front is 2 mums, another echinacea, a row of celosias that have not fared well at all, and my lemon thyme next to the steps. In the pots on the Victorian iron plant stand are seeds from some pink and yellow four o'clocks.
A closeup of the miniature rose and the 2 petunias. The striped one is doing far better than the other. Not entirely sure why, since both were the same size when I planted them.
Here's an updated picture of the round flowerbed, with the cannas to the side and the sod that's desperately struggling to survive in place.
An updated picture of the oval flowerbed near the road and the blooming crepe myrtle. And here's the lantana. It's come a long way as well, pretty much tripling in size from the 2 stems that came in the 4" pot.
And I will end this blog entry (about time too, I'm sure! It's not easy cramming 2-3 months worth of stuff into one post!) with closeup images of my King Humbert canna blooms:
Until next missive, be good, stay cool, and enjoy your own gardens!


No comments:
Post a Comment